
Table of Contents
Introduction
How to Solder Wires – Soldering is the process of joining two metal components using a molten alloy of lead and tin. It is a common technique used in electronic and electrical industries. Soldering is important because it provides a strong and permanent bond between two metal components. It is also used to repair broken or damaged electrical components. The types of wires that are commonly soldered include copper wires, aluminum wires, and silver wires.
Safety Measures
Soldering can be dangerous if not performed correctly. Therefore, it is important to take proper safety measures when soldering. One of the safety measures is wearing proper attire for soldering, such as safety glasses and heat-resistant gloves. It is also essential to prepare the workspace properly, including proper ventilation to avoid inhaling harmful fumes. Handling soldering equipment requires special attention, including turning off the soldering iron when not in use and placing it on a non-flammable surface. Emergency preparedness includes having a fire extinguisher nearby and knowing how to use it.
Soldering Tools and Materials
There are different types of soldering irons that are used for different purposes. Some have adjustable temperature settings, while others have fixed temperatures. Different types of solder are also available, including lead-free solder, silver solder, and flux-core solder. Flux is an important material used in soldering as it helps remove oxides from the surface of the metal and promotes better bonding. Other materials needed for soldering include soldering stands, helping hands, and soldering wire.
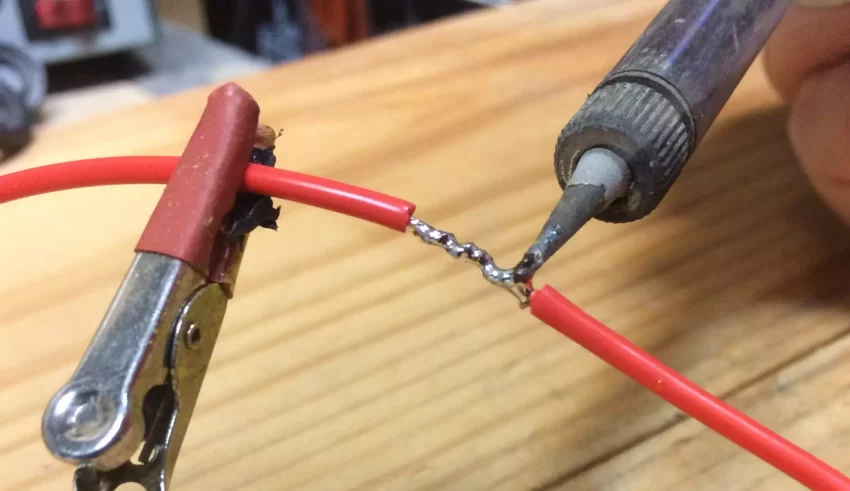
Preparing Wires for Soldering
Before soldering wires, they need to be cut and stripped to expose the metal conductor. Tinning wires involves coating the exposed wire with solder to protect it from corrosion and provide a better surface for bonding. A pigtail is a technique used to twist two wires together, making it easier to hold them in place during soldering. Joining wires of different gauges requires special attention to ensure a strong and permanent bond.
Soldering Techniques
Choosing the right tip for your soldering iron is crucial, as it affects the temperature and precision of the soldering. Holding the soldering iron correctly involves gripping it at the base and avoiding touching the tip. Adding flux and solder to the wires requires careful attention to avoid using too much or too little. Soldering techniques for different types of joints include butt joints, lap joints, and T-joints. The angle of the soldering iron and the amount of solder used varies depending on the type of joint being soldered.
Troubleshooting Common Soldering Problems
In this section, we’ll discuss some of the common problems that can occur during soldering and how to troubleshoot them.
Cold Joints
A cold joint is a solder joint that didn’t get hot enough to melt the solder completely. This can happen if the soldering iron is not hot enough, or if the soldering iron is removed from the joint too quickly. To fix a cold joint, simply reheat the joint until the solder melts and flows smoothly.
Burned Wires
If you apply too much heat to the wires during soldering, they can become burned and brittle, which can lead to a weak connection. To avoid this, make sure to only apply heat for the necessary amount of time and avoid overheating the wires. If you do burn the wires, you’ll need to cut off the burned section and start again.
Solder Bridges
A solder bridge occurs when two wires are inadvertently joined together by excess solder. This can be prevented by applying the solder carefully and making sure it only goes where it’s intended. If you do end up with a solder bridge, you can remove it by using a desoldering tool or braid.
Solder Balls
Solder balls are small bits of solder that can get trapped between the wires during soldering. They can cause problems with the connection and should be removed. To remove solder balls, use a solder wick or braid to soak up the excess solder.
Cleaning and Finishing
Now that you’ve successfully soldered your wires, it’s important to clean up the excess flux and residue to ensure a clean and professional finish. Here’s what you need to do:
Cleaning Excess Flux and Residue
After soldering, there will be excess flux and residue left on the wires. To remove this, use a damp sponge or cloth to wipe away the excess. Be sure to do this while the soldering iron is still hot to make the process easier.
Insulating the Wires
To protect the connection from damage and exposure, it’s important to insulate the wires after soldering. Use electrical tape or heat shrink tubing to cover the soldered joint and prevent any accidental shorts or breaks.
Final Checks for Proper Connection
Before using your newly soldered wires, it’s important to perform a final check to ensure a proper connection. Use a multimeter to test the continuity of the wires and make sure there are no breaks or shorts.
Proper Storage of Soldering Equipment
To prolong the life of your soldering equipment, it’s important to store it properly. Make sure to clean your soldering iron after use and store it in a dry, safe place. Keep your solder, flux, and other materials in a cool, dry place to prevent moisture buildup.
Conclusion
Soldering wires may seem intimidating at first, but with the right tools and techniques, it’s a skill that anyone can learn. By following the steps outlined in this comprehensive guide, you’ll be well on your way to creating strong, reliable connections for all your electrical projects. Remember to always practice proper safety measures and never hesitate to ask for help or guidance if you need it.


